
TL;DR
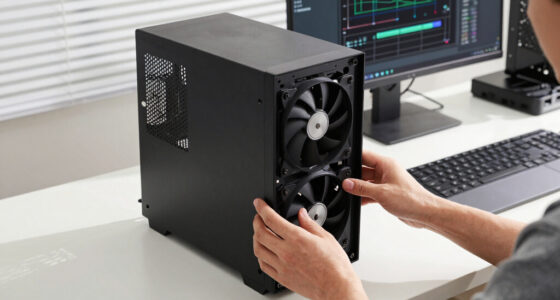
Moving your rig into a closet and treating it with the right materials dramatically reduces noise and echo. Proper placement and ventilation are key to making a small space both quiet and functional without sacrificing sound quality.
Ever wonder why some closet studios sound so much better than others? It’s not just about stuffing foam everywhere. The secret lies in where you place your gear, how you treat the space, and how you handle heat. You can turn a tiny, echoey closet into a whisper-quiet, professional-sounding workspace — if you do it right. Learn more about acoustic treatment setup.
This article breaks down the real tricks: from the importance of distance, to smart dampening, and the crucial role of ventilation. If you’re tired of muffled recordings or noisy rigs, stick around. You’ll learn how to make your closet work for you, not against you.
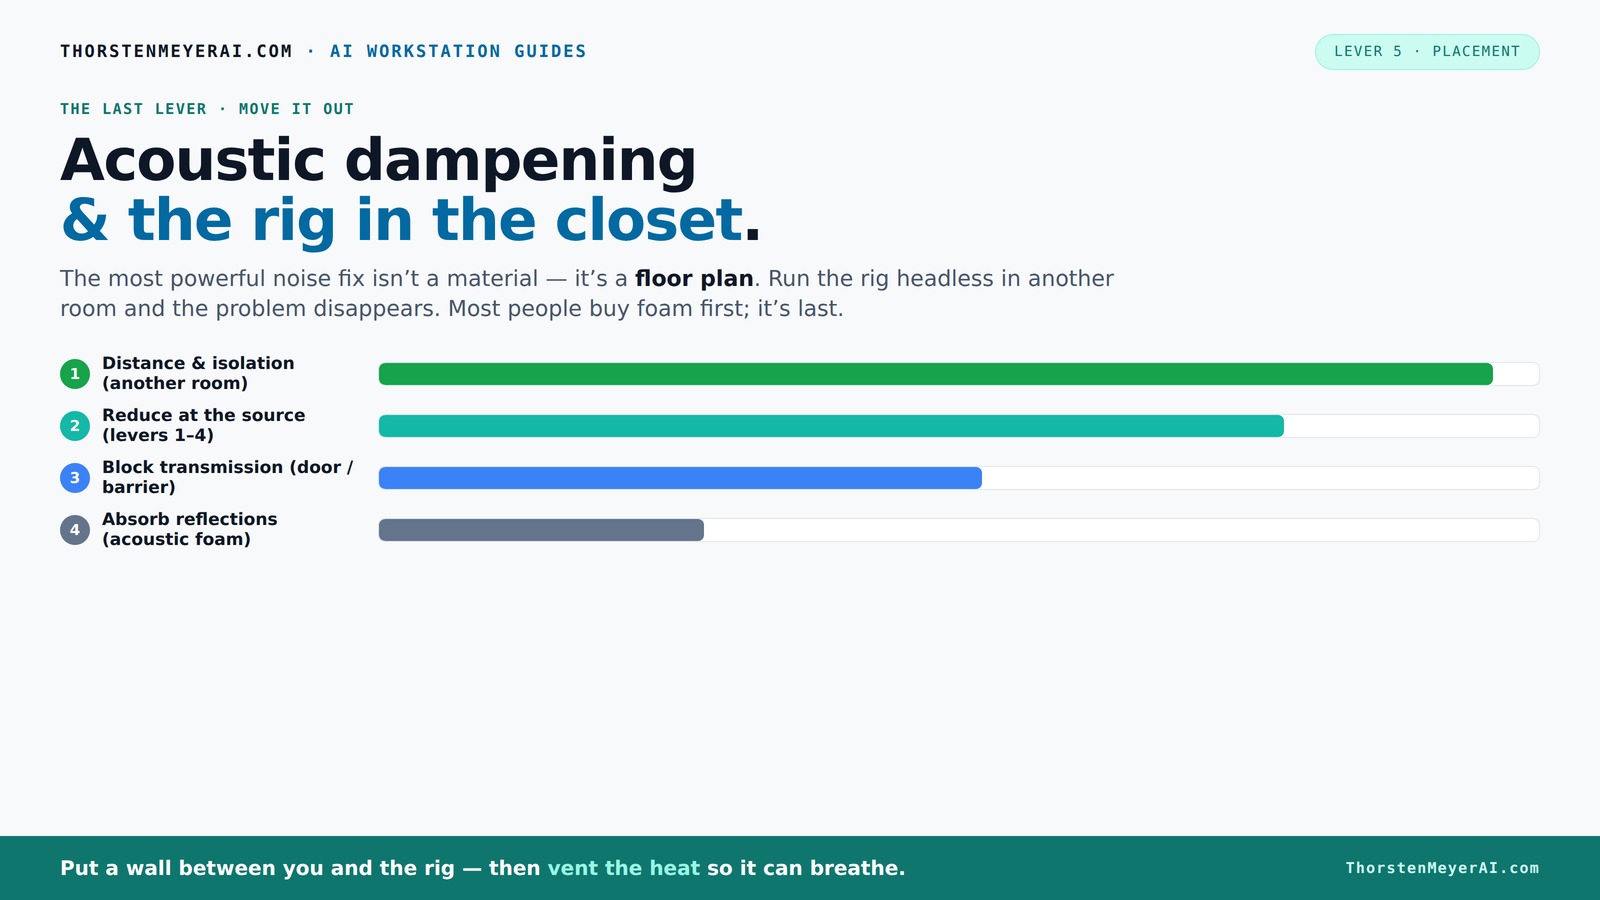
Acoustic dampening
& the rig in the closet.
The most powerful noise fix isn’t a material — it’s a floor plan. A rig you can’t hear because it’s in another room beats any amount of foam. Tap the approaches in Part 1 to see what actually works.
(another room)
(levers 1–4)
(door / barrier)
(acoustic foam)
Contain the noise, not the heat
Key Takeaways
- Relocating your rig to a different room is the most effective way to cut noise without complex treatments.
- Proper ventilation is critical when placing a hot, powerful machine in a closet — passive vents and exhaust fans prevent overheating.
- Acoustic dampening and soundproofing serve different purposes: dampening reduces echo inside, soundproofing blocks leaks at the edges.
- Position treatment panels at reflection points, especially behind your mic, and add bass traps to control low-end boominess.
- Seal gaps around doors and floors with weatherstripping and rugs to stop sound leaks and improve overall isolation.

Focusound 52 Pack Acoustic Foam Panels 1" x 12" x 12" Sound Proof Foam Panles Soundproofing Noise Cancelling Wedge Panels for Home Office Recoding Studio with 300PCS Double-Side Adhesive
Soundproofing - Acoustic foam panels triangular grooves structure for better noise absorption, helps to reduce and absorb unwanted...
As an affiliate, we earn on qualifying purchases.
As an affiliate, we earn on qualifying purchases.
Why Moving Your Rig Is the Best Noise Solution
Want to cut noise to zero? The best fix is simple: put your rig somewhere else. A different room, a closet, a basement. Once you’re not sitting right next to a loud GPU, the noise drops drastically.
Imagine working in a quiet corner while your gaming PC roars in the next room. You talk to your AI models over a network, so physical proximity isn’t always needed. The noise? It’s gone from your workspace, not just muffled.
Two keys: reliable wired connection and good ventilation. Without airflow, your rig will overheat — and that’s when noise, and damage, follow. So, moving your rig is the smartest, most effective fix for noise issues.

Audimute Soundproofing Acoustic Door Seal Kit - Door Sweep and Seal - (Large Size)
Includes (2) Door Seals (3/16" x 1/2" x 50') and (1) Door Sweep (1/2" x 1.5" x 25').
As an affiliate, we earn on qualifying purchases.
As an affiliate, we earn on qualifying purchases.
The 'Rig in the Closet' Setup — How to Keep It Cool and Quiet
Placing a hot, powerful machine in a closet sounds perfect — until it overheats. The trick is proper ventilation. You need airflow paths: passive vents, exhaust fans, or even ducted systems. See how to optimize your rig placement.
Sealing the closet completely traps heat, turning it into a makeshift oven. Instead, create a controlled airflow: a quiet exhaust fan pulling hot air out and drawing cooler air in. Consider a soundproof cabinet with temperature control if noise and heat are both concerns.
Here's a quick checklist:
- Active ventilation — fans or vents
- Don’t fully seal the space without airflow
- Use ducted cooling for serious heat load
- Monitor temperature to prevent overheating
For more details, see the comprehensive guide on how to [reduce heat and noise in your AI workstation](https://thorstenmeyerai.com/reduce-heat-noise-ai-workstation/).

Sound Addicted - Studio Monitor Isolation Pads for 5 Inch Monitors, Pair of Two High Density Acoustic Foam which Fits Most Speaker Stands | SMPad 5
SMPad 5 is made out of the highest quality acoustical foam (50kg/m^3 density).
As an affiliate, we earn on qualifying purchases.
As an affiliate, we earn on qualifying purchases.
Acoustic Dampening vs. Soundproofing — Know the Difference
Acoustic dampening is about softening sound reflections inside your closet — making recordings clearer and echo-free. Soundproofing, on the other hand, keeps noise from escaping or entering the room.
Think of dampening as putting soft pillows on walls, while soundproofing is sealing the door and walls with mass and insulation. Both are crucial, but they serve different purposes. Discover the difference between dampening and soundproofing.
Understanding this distinction is vital because it influences your material choices and placement. Dampening inside the space reduces internal echo and improves clarity, which is essential for accurate recordings. Soundproofing at the edges prevents external noise from contaminating your recordings and keeps your noise from disturbing others. Neglecting this can lead to a false sense of quiet—your recordings may sound good internally but still leak noise or be contaminated by outside sounds. Balancing both approaches ensures a controlled environment that’s both acoustically pleasant and practically silent from outside sources.

TroyStudio Portable Vocal Booth, Large Foldable Microphone Isolation Shield, Music Recording Studio Sound Echo Absorbing Box, Desk & Stand Use Reflection Filter with Thickened Dense Acoustic Foam
【BASIC INFO】: Inside size after setup: 8'' (L) X 10'' (W) X 12'' (H), large space for various...
As an affiliate, we earn on qualifying purchases.
As an affiliate, we earn on qualifying purchases.
Where to Place Acoustic Treatment for Maximum Effect
Your placement of acoustic panels makes all the difference. The first step: identify the main reflection points — usually the wall behind your mic and the surface facing you.
Imagine standing in your closet with a mic. The wall directly behind you is the biggest reflection point. Cover it with foam or panels. Next, treat the ceiling and floor if they’re hard surfaces that bounce sound.
Pro tip: place bass traps in the corners of the closet to tame low-end buildup. These areas tend to amplify the boominess, which can muddy your recordings and make mixing difficult. Proper placement of these traps ensures that low frequencies are absorbed before they create standing waves, resulting in a more balanced and natural sound.
Here’s a simple placement plan:
- Identify primary reflection points around your mic and treat them with acoustic panels. Find out where to place acoustic treatment.
- Cover the back wall and ceiling
- Add bass traps in corners
- Use softer materials like blankets or rugs on the floor
Effective placement reduces unwanted echoes, making your recordings clearer and more natural, and prevents the small space from sounding artificially dead or overly boxy.
Materials That Make Your Closet Sound Better (and Quieter)
Good materials are the backbone of a successful closet studio. Foam panels are popular because they absorb high frequencies — think of their soft, porous texture as a sponge for sound waves.
Blankets, rugs, and moving blankets are surprisingly effective, especially for DIY setups. They’re dense enough to soften reflections and reduce echo, and they add mass to surfaces, which helps block sound transmission. Using these materials in combination allows you to tailor your acoustic environment to your specific needs, balancing absorption and containment.
For low-end control, bass traps in corners are essential. They’re made of dense foam or mineral wool, designed specifically to soak up those booming frequencies. Incorporating bass traps minimizes low-frequency buildup, which often causes muddiness and a boomy sound, especially in small spaces.
Pro tip: don’t rely solely on foam. Combine panels, blankets, and bass traps for a well-rounded sound. This layered approach ensures that high, mid, and low frequencies are appropriately managed, leading to clearer, more professional recordings.
And yes, rugs on the floor can cut down on sound bouncing around, especially if your closet has a hard floor. They also add aesthetic value and can help reduce reflections from below.
Treat the Gaps, Doors, and Floors — Stop Sound Leaks Cold
Cracks, gaps, and poorly sealed doors are the weak points in your closet’s soundproofing. Sound passes through these openings like water through a sponge, undermining your entire effort to contain noise. Learn how to seal gaps effectively.
Sealing gaps with weatherstripping, acoustic sealant, or door sweeps creates a continuous barrier, which is crucial because even tiny leaks can let in significant noise or let your sound escape. Proper sealing improves your overall isolation and prevents external sounds from contaminating your recordings. Covering gaps around the door frame with a heavy curtain or installing a door plug made of foam or mass-loaded vinyl can drastically improve soundproofing. These additions act as barriers that absorb or block sound transmission paths.
Floor treatment matters too. Use rugs or mats to absorb sound bouncing off the ground, especially if your closet has a hard surface. This also prevents sound from traveling underneath or around the door, which are common weak points.
Remember: the goal is to block all those tiny leaks that undermine your entire setup. Proper sealing and covering of these areas ensure a much higher degree of sound isolation, making your closet a more effective soundproof environment.
Handling Low-End Buildup and the Boxy Sound
Ever feel like your recordings sound like they’re in a cardboard box? That’s low-end buildup — standing waves and boominess caused by parallel walls and small spaces that reflect and reinforce bass frequencies excessively.
To fix this, add bass traps in corners where low frequencies tend to concentrate. Thicker, 4-inch panels work better for bass absorption in larger small spaces, helping to tame the low-end boominess that can muddy your mix. Experimenting with angling panels or adding diffusers to break up standing waves can further improve clarity. Even a simple DIY bass trap using rockwool or dense foam can significantly reduce muddiness, making your recordings sound more balanced and natural. Think of it like tuning a guitar string — a little tweak here and there makes your sound clearer and more natural, avoiding the artificial, boxy tone that can plague small, untreated spaces.
Common Mistakes That Sabotage Your Closet Studio
Many creators overdo foam, ignore gaps, or treat only the corners. The result? Dead-sounding recordings or noise leaks that defeat your efforts. Overusing foam can deaden the room, making recordings sound unnatural and muffled, which hampers the clarity and realism of your sound. Ignoring gaps and leaks allows external noise to seep in and internal sound to escape, undermining your entire setup. Focusing only on corners without addressing reflection points can lead to uneven sound treatment, causing certain frequencies to be over-absorbed while others remain uncontrolled. And never forget ventilation — a rig in a sealed closet without airflow is a disaster waiting to happen, risking overheating and equipment failure. Plan your setup step-by-step, focusing on real problem areas, and you'll avoid the rookie mistakes that compromise your sound quality and noise isolation.
Frequently Asked Questions
What is the difference between acoustic dampening, soundproofing, and sound isolation?
Acoustic dampening softens reflections inside a space, reducing echo and reverb. Soundproofing blocks sound from passing through walls or doors. Sound isolation combines both to keep noise in or out, depending on your goal.Where should I place acoustic panels in my closet booth?
Start by placing panels directly behind and around your microphone’s reflection points — usually the back wall and ceiling. Add bass traps in corners to handle low frequencies, and soften the floor with rugs.Do I need to treat the closet door and gaps?
Yes. Cracks and gaps are weak points for sound leaks. Use weatherstripping, acoustic sealant, or heavy curtains to block these passages. Sealing around the door frame makes a big difference.How thick should panels be for a small closet?
2-inch panels are usually enough for small spaces, but if you have a larger closet or want better low-end control, 4-inch panels are worth the investment. Bass traps in corners help with low frequencies.Will foam alone stop outside noise?
No. Foam absorbs high frequencies and reduces echo but does little to block sound from entering or leaving. For serious noise reduction, combine foam with sealing gaps and adding mass to walls.Conclusion
Placing your rig in a closet can transform your workspace — if you do it right. Focus on ventilation, proper placement, and sealing gaps, and you’ll end up with a quiet, high-quality studio. It’s not about magic — it’s about smart, practical choices.
Next time you think about noise, remember: the best soundproofing is moving away from the noise source. Your closet can be your secret weapon — just treat it with care.